
A few weeks ago, I was invited to a friend’s bachelor party in Milwaukee, WI. The email I received was short, but included the itinerary for the day that the best man had planned for our group. As I scanned it for important info,
“…leave Saturday morning, Lakefront Brewery tour, fire shotguns at the range, catch the Brewers baseball game that night…”
…it initially didn’t hit me, and I had to read it through a second time.
Ahh, there we go;
We were going to be firing guns.
My first thought, not to mention exclamation aloud to my girlfriend was, “I need to record this!” She laughed, seeing the excitement in my face.
I hadn’t recorded firearms before, but immediately began running through my rolodex of mics to bring, techniques to use, preamps to dial in, etc. Just as immediate, was my realization of the abundance of circumstances that could negatively affect what could be considered a useable recording.
As weeks grew closer, the party settled on 5 guys total, myself included. By that point I had made a list of circumstances that could render my recordings useless or impossible to capture:
1. The other guys wouldn’t be okay with me recording (though unlikely, still possible)
2. The gun range wouldn’t be okay with me recording
3. Weather may not cooperate, and bringing gear could be a waste of time and space
4. There may be unwanted surrounding noise (passing cars, planes, other shooters, music playing, etc.)
5. Not enough room in our vehicle for extraneous equipment
Ultimately, I determined that because of the above factors, I had no choice but to rule out anything larger than handheld. The 416’s, Sound Devices, and Rycote blimps were staying home this time.
I determined that my daily rig, the one that I carry everywhere with me in my bag, was to be my safest choice.
The rig includes:
• Sony PCM M10 Recorder
• 4’ telescoping tripod
• Furry wind screen
(As of late, I also carry a Lite2Sound PX, Elektrosluch 3, and Logitech UE Roll for impulse responses, but I would be leaving those at home this time.)
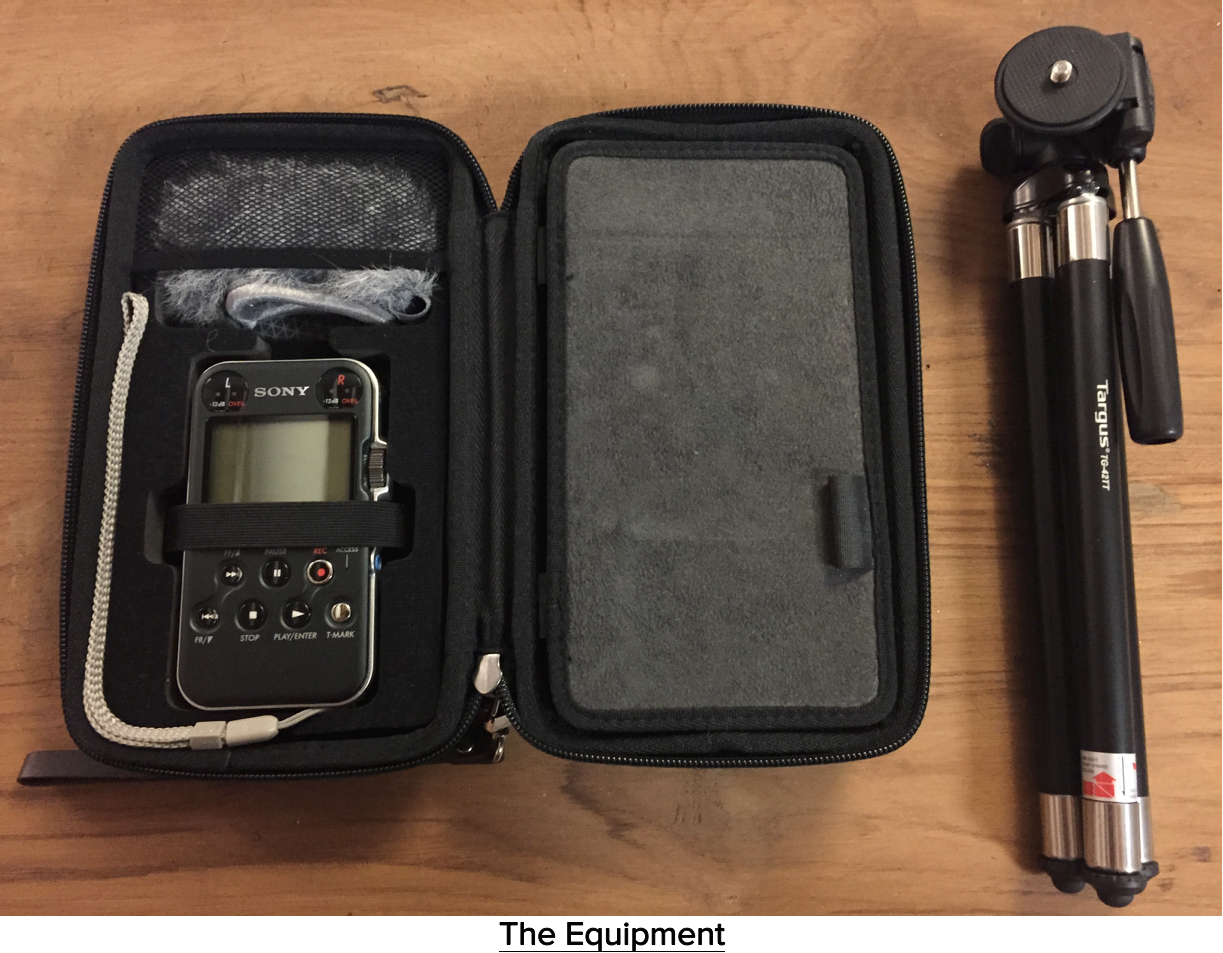
Heading into the big weekend, I felt that I was definitely about to see what this little field recorder was capable of. The Sony PCM M10 is a pretty great sounding device. It features fantastic internal preamps and microphones, seemingly never-ending battery life, and a super low price point. The shortcomings I could face (if there were nearby audio interference), very well could be the fault of the M10’s internal mics being omni-directional, rather than cardioid, as is such with the onboard mics of many other handheld field recorders. This could also be a benefit if any surrounding noise was nominal, capturing a wider directional range for gunshot tails.Heading into the big weekend, I felt that I was definitely about to see what this little field recorder was capable of. The Sony PCM M10 is a pretty great sounding device. It features fantastic internal preamps and microphones, seemingly never-ending battery life, and a super low price point. The shortcomings I could face (if there were nearby audio interference), very well could be the fault of the M10’s internal mics being omni-directional, rather than cardioid, as is such with the onboard mics of many other handheld field recorders. This could also be a benefit if any surrounding noise was nominal, capturing a wider directional range for gunshot tails.
Stepping out of the car into the parking lot of the Waukesha Gun Club, my initial thoughts were,
“This seems doable.”

Passing cars from the nearby road were infrequent and distant enough to not become an issue. It also seemed like a slow day at the range, with only a couple other shooters. At that, it was a balmy 85 and sunny with a slight 1-4 mph wind.

None of us 5 had ever shot 12 gauge shotguns before, and many of us had never fired a gun of any size (myself included). We determined that we’d rent 2 guns, and fire 50 rounds apiece at clays.
After some initial safety overview from our gun range officer, Jim, we headed out with ear and eye protection to our slot, which happened to be the last in the series of about 5, and closest to the nearby road.

Be a party of 5, the slot conveniently had an accompanying 5 lanes to shoot clays from, one for each of us to get a different angle of fire.

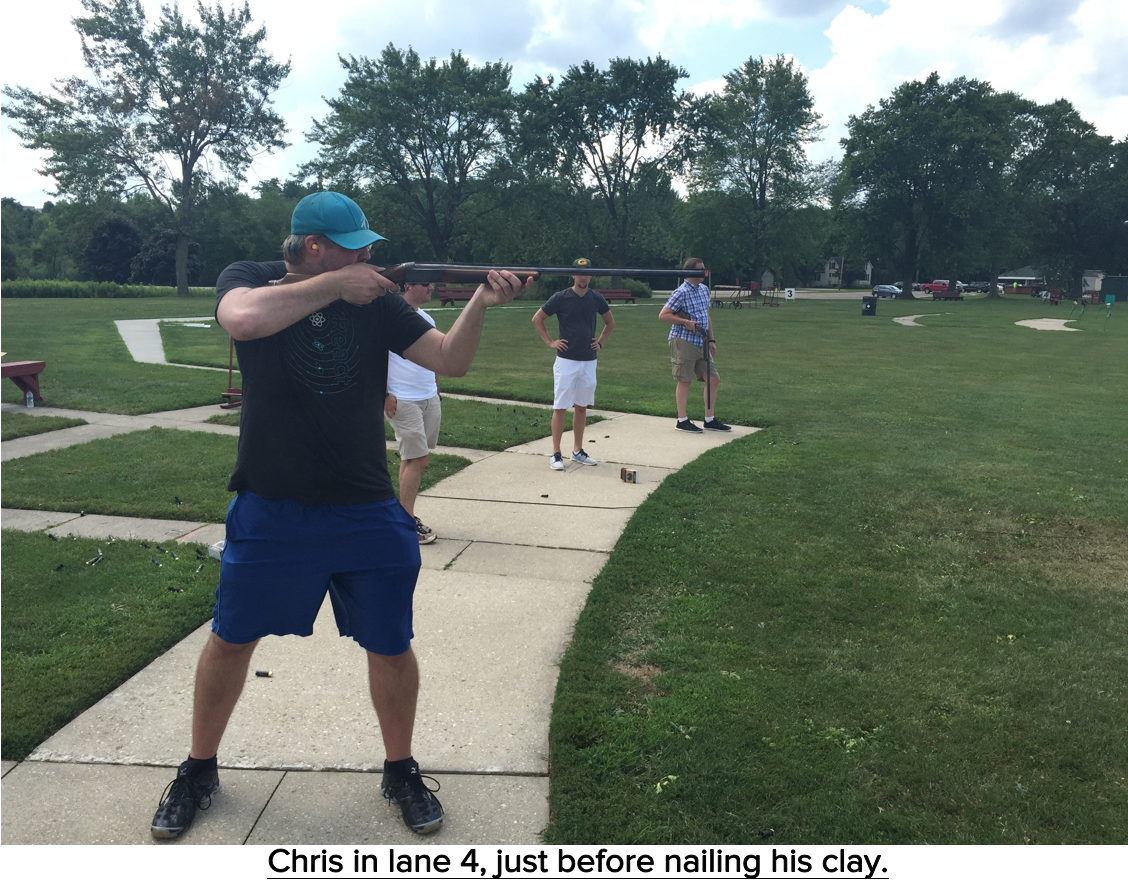
Each box of 25 shells was placed on the ground beside us, and after we had gone down the line and each fired one round, we would rotate to the next lane right of us. This pattern repeated every 5 rounds for each of our 50 total for the day.
In order to prep for this recording, I diligently listened to the Tonebenders Podcast “Firearms Recording Roundtable” episode. Along with some absolutely vital information on how to record guns from Frank Bry and Charles Maynes, host Rene Coronado describes a useful multi-mic technique for times when you only have one microphone at your disposal.
The basis is pretty simple, but will likely only work with transient sounds that are repeated in identical fashion, like gunshots. In Rene’s case, it was baseball hits in an empty stadium.
Because each gun shot is going to sound nearly identical, recording any number of shots in one perspective, and then moving your rig and recording a different perspective, allows you to sync the transients in post, thus creating a simulated multi-mic setup.
(you can listen to Charles and Rene describe this technique here, around the 17:30 mark.)
Gun Range Officer Jim had no problem with me setting up my rig and moving it around, and the bachelor had even brought a few GoPros to capture some footage.
It was time to start recording!

I began by setting the PCM M10 on my tripod, fully extended, about 3 feet away from where I would be firing. Mic sensitivity was set to LOW, with a gain of 1, and would be recording in 96kHz/24bit. After checking levels of a few shots, with peaks averaging around -12dB, I started rolling. This would be perspective 1 in my multi-mic post technique.

I rolled about 20 shots from this perspective before cutting. I quickly realized that one of the added benefits of our setup and its lanes, is that as each of us took our shots, I was able to get those distance perspectives as well. So not only would I have a 3 foot perspective from my shots, but also a 6, 9, and 12 foot perspective as the other guys fired too.
As the day progressed, I moved the rig several times, capturing the following different perspectives relative to my firing lane:
• Perspective 1 - 3 ft, right of gun
• Perspective 2 - 10 ft, right of gun
• Perspective 3 - 50 ft, right of gun
• Perspective 4 - 10 ft, behind gun
• Perspective 5 - 70 ft, left of gun

After a long day of shooting, in which I feel I did pretty well (31/50 clays hit), we packed up and continued on with our planned weekend festivities. I’d have to wait until Monday to dump this audio into a session.
Once I copied over the files to my computer, I start by importing them into Adobe Audition in “Waveform View” and marking shots I like from each perspective. I typically do this first with my field recordings in Audition, primarily because the Sony Sound Forge release on Mac doesn’t come close to its Windows counterpart in my opinion.
I decide that I’d like to start my multi-mic comping with 3 different perspectives, and after listening to several shots from each perspective, ultimately settle on the following:
• Perspective 1 - 3 ft, right of gun
• Perspective 3 - 50 ft, right of gun
• Perspective 4 - 10 ft, behind gun
I throw individual shots from the above perspectives into a new Logic Pro X session, and begin designing. Aligning the transients from each shot, my first round of processing involves heavy compression, along with transient shaping, noise reduction, and subtle EQ. You can see the session below, as well as the signal chain on the far left.

Here’s what the first stage of processing sounds like:
In the second stage of processing, much of the first stage is further repeated, in addition to adding some sub bass.

Here’s what the second stage of processing sounds like:
In the third and final stage of processing, only subtle EQ is applied.

I repeat this process 6 separate times, using the same perspectives but with different shots. I then edit these onto one track with 1 second spaces between them, and export it for use in my library. This track, with all 6 finished shots, can be heard below.
Overall, I’m extremely pleased with the results, especially considering the equipment used. In the coming days, I plan to process different combinations of perspectives and shots to get the widest variety from the recordings.
I had a ton of fun recording and editing these gunshots, and hope you enjoyed reading about my experience! I could continue to write about how loud the guns were (very, trust me), the smell of the gunpowder, or how damn cool it was when a shell was ejected, but I feel as if I’ve gone on long enough already.
Feel free to reach out to me with any questions or comments, and if you’d like to use the finished shots for yourself, I’ve allowed the track above to be downloaded in full 96kHz/24 bit quality for free.
Thanks for reading!